
Baumkuchen or Schichttorte

I read a lot of my fellow food blogs. I really don’t have any particular preference when it comes to putting them on my reader. But I do tend to gravitate towards those food blogs that have beautiful photography and out of the box creativity when it comes to making recipes.
So, it’s no surprise that when I ran into Sandra Mangas web page – “La receta de la Felicidad” I was immediately in love with her photography and the creativity of her recipes blew me away. She is fun, and wimsy and her recipes are delicious too.
Go visit her right now and see what I mean.
A couple of weeks ago, her post of “Bizchoco Rayado” went live and with it an explosion of bakers ran to their kitchen to make their version of her take on the popular Baumkechen or if you read a bit more, the layered version called “Schichttorte”.
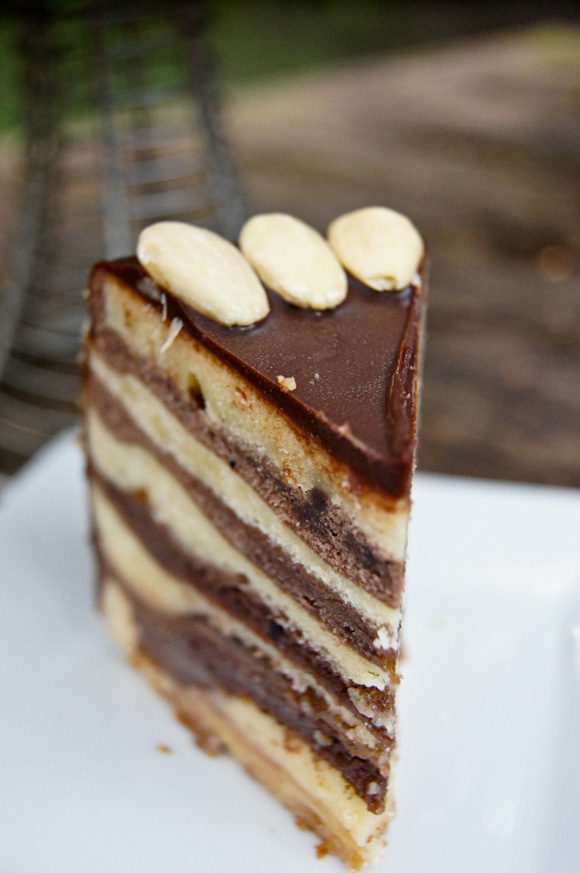
Traditionally, Baumkuchen is made on a spit by brushing on even layers of batter and then rotating the spit around a heat source. Each layer is allowed to brown before a new layer of batter is poured. When the cake is removed and sliced, each layer is divided from the next by a golden line, resembling the growth rings on a crosscut tree. A typical Baumkuchen is made up of 15 to 20 layers of batter.
A simpler horizontally layered version of the cake called a “Schichttorte” also exists. It is baked without a spit and thus does not have circular rings but horizontal layers. The horizontally layered version results in a Baumkuchen that is more similar in shape to conventional cakes. It can also be baked in a conventional household oven that has a broiler inside, whereas the traditional spit version requires special equipment normally not available in an average household. However, unlike with the spit variant, the Schichttorte cross section is less reminiscent of tree rings.
The recipe is not hard to do at all. Once you got your batter all set then it’s a matter of having time and patience because the hardest part, at least for me, was to wait between each layer cooking under the broiler. You cannot walk away from this or you will pay the pretty price of getting a burn layer.
I really did not do anything different from her recipe, except that I took a tip from the original Baunkechen, where they spread some apricot preserved between each layer. So I warmed up a bit of apricot preserved with brandy and between each of the vanilla layer spread this before topping it with the chocolate batter.
I wanted more layers too, so I decided to use my 6 by 3 baking pan and I had very little batter left over at the end.
I covered the sides with blanched almonds that I process in my food processor, after cooking them in the oven for a bit.
The cake was a hit, not only visually but also tasty. Tom, who is not a big fan of anything chocolate, really liked it. I also think that the apricot layer added a great component to it, making it just right.
I will make it again, but I’m going to really work on making my layers a bit more even.

Tips:
Weight your batter in order to have equal amounts between the chocolate and vanilla layers.
Play with it. You can use food coloring instead and really make different color variations.
After I poured the last batter on the last layer, I still had a bit of doubt about having all the layers cooked, so I actually switched my oven to 350 F and cooked the whole cake for 15 minutes.

You can find tons of different recipes all over, I used Sandra’s recipe, but I found this one from How to Bake, which has nice step by step photos.
So, are you going to try your hand at it? If you do, come back and post it here, would love to see everyones result.